
Emergency Kit Essentials and Other Supply Kits to Make

5 minute read
+ Affiliate Disclosure
This post contains affiliate links. All that means is I’ve provided some product suggestions that I get a commission for, should you click on them and make a purchase. I only suggest products I use and love that are directly related to the content in this post. Thank you for your support! View terms for more information.
What You’ll Get From This Article | Quick Navigation Links

September is technically National Preparedness Month, but it’s never too late to put together your own emergency kits. Being prepared is one of those things that people know they should prioritize but don’t. Since there’s usually not an immediate need, kits get put into the “I’ll get to it eventually” category. “Eventually” comes for us, and suddenly we must face situations where we need a prepared kit. We’re kicking ourselves all the way to the store to grab what we can to fix the situation.
A year ago I went down the rabbit hole on YouTube and watched tons and TONS of videos about building different preparedness kits - disaster preparedness kits, specifically. There are many directions you can take, like dollar store options (which I don’t really recommend), build-your-own, or all-inclusive kits that cost over 6 months’ worth of mortgage payments. I did some more research and decided on the build-your-own strategy by acquiring supplies at your own pace.
My advice is to plan and build a couple different kits every year. If you’ve never done this before, start this month. Pull out your calendar and pencil in time to do it when you know you have an afternoon to focus and get it done. I’ve outlined ideas and strategies to get you started so you don’t feel overwhelmed and run away. Once you have the correct supplies and see how easy and convenient this process is, you’ll probably find other excuses and circumstances to prepare a kit. My system makes their configuration modular so they’re super portable and easy to store. Be sure to check out the affiliate links to my favorite supplies. They’re products I’ve used personally and often recommend to clients when helping them build their own kits.

How to Get Started Building Your Kits
The first, and often hardest step, is to determine what type of kit you might need. The most obvious type is an emergency kit. Other examples might be arts and craft kits for kids, games and activity kits for car trips, and non-perishable snack kits. If you encounter a circumstance in your life that seems fitting for preparing a portable kit, write it down and plan a time within the next month to make it!
The next step is to find the right storage container. I recommend tackle boxes, craft supply storage boxes, or makeup caboodles. One of my favorite options is this bin with a small supplies tray, larger item storage below, and a snap-close lid. Another great option is a stackable system that allows you to create multiple kits that snap together.

So let’s talk more about the most important kit to create - the basic emergency kit.
Everyone should have at least one that covers survival bases like water, food, and first aid. At ready.gov/kit they have a comprehensive list of supplies we’ll go through here, and my own suggestions so you can build your own.
I’d advise customizing your emergency kit based on how many people you’re creating it for, and the climate you live in. Each person will need access to a certain amount of supplies, so make sure you have enough of each thing for everyone. Here’s a basic supplies list for a 3-day emergency kit. I’ve provided some affiliate links to my favorite gear that I used to make my own emergency kits.
Water - one gallon per person per day for at least three days, for drinking and sanitation. I’d also suggest checking the website findaspring.com to see if there’s a natural spring near you to fill an aquatainer.
Food - at least a three-day supply of non-perishable food for each person.
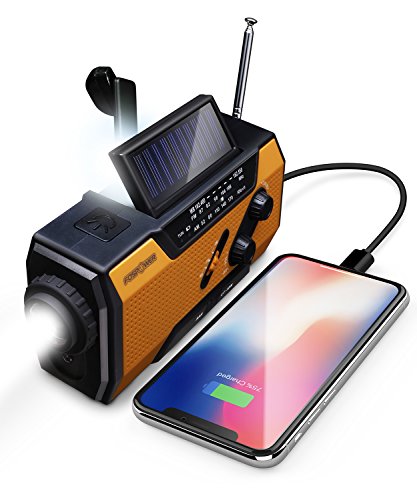
Battery-powered or hand crank radio and a NOAA Weather Radio with tone alert. This one is solar powered, has a flashlight, and has a USB port to charge a smartphone.
Flashlight with super bright, long lasting LED light bulbs that doubles as a lantern.
First aid kit. This one goes beyond the basic home first aid and has more advanced supplies.
Extra assortment of batteries (AA and AAA at least.) Go through your devices and write exactly which type of battery they use and how many.
Survival Whistle. Get this kind specifically because they can be heard from further distances.
Dust mask with extra filters for heavy pollution.
Plastic sheeting and duct tape to protect rooms during a shelter in place situation.
Moist towelettes, antibacterial wipes, garbage bags for sanitation and clean up.
An assortment of general wrenches and pliers.
Manual can opener. If you don’t know how to use one, get familiar and use it at home regularly.
Local maps in case you don’t have access to your cellular network or internet.
Cell phone with solar chargers and extra charger cords.
Now we should talk about important optional supplies.
These are things for pets, infants, or toddlers. Start building lists of your preferred essentials for members of your household for travel. These lists will make it easier to pull ideas from when you need to supplement your emergency kit. I’ve included a few more affiliate links to supplies.
Prescription medications like blood pressure medication, epipens, and inhalers. Try to have backup if possible.
Non-prescription medications such as Ibuprofen pain reliever/fever reducers, anti-diarrhea medication and antacids.
Prescription eyeglasses and contact lens solution.
Infant formula and travel container, bottles, diapers, wipes and diaper rash cream.
Pet food and extra water for your pet.
Cash or traveler’s checks.
Important family documents such as copies of insurance policies, identification and bank account records saved electronically AND in a waterproof, fireproof portable container.
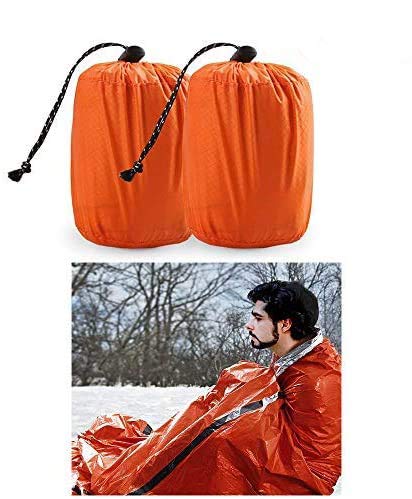
Thermal sleeping bag or warm blanket for each person.
Complete change of clothing appropriate for your climate and sturdy shoes for each person.
Waterproof Matches (yes, those do in fact exist).
Personal hygiene items, including feminine hygiene supplies.
Camping mess kits with cookware, vessels and utensils.
Mini self defense kit with mace.
Paper, pen, and pencil.
Books, games, puzzles or other activities for children.
Maintaining your kit is almost more important than making it.
Once you’ve gathered supplies and packed them in your storage bin, store them in a cool, dry, accessible place. Everyone should know where the kits are in case you aren’t able to grab them yourself. Ideally, try to have them already in your home, car, and at work, since you never know where you’ll be when you need it.
Know when to update and/or replace items. It’ll save you time if you also record the expiration date of supplies on your list. Add a reminder in your calendar for a general time to replace expired items and update as your needs change. The more often you stay on top of something like this, the less time it will eventually take you. As you build and update your stock, the process becomes easier.
If you’re just getting started, don’t overwhelm yourself by thinking you have to go out and buy all the supplies right away. There are super comprehensive, all-in-one style emergency kits out there, but good ones are hundreds, if not thousands of dollars. If that’s your style and you’d rather just get the process over with, go for it. Usually when I help clients with their kits, we start by building a list and then acquire the first 5 items (food, water, batteries, first aid and a flashlight.) We then designate times throughout the year, review their list, and gather additional supplies. You can spread the task out over time and be fully equipped with a solid emergency kit in six months to a year.
Build and stock your other kits, like the activity kits mentioned previously, in the same way. Start by creating a list of your needs, find the container to hold them, and gather the first 5 items on the list. Set a timeframe to bolster your supplies and set reminders to do so when it’s convenient for you. Store your kits in a cool, dry place away from potential fire/water damage and make sure everyone knows where they are.
You can do this! Think of how at ease you’ll feel tackling this task and creating this habit. I’m proud of you for just thinking about it. Don’t sit back and wait for the need to arise before you take action.
Download my starter checklist below. (It’s free, and there’s no sign up required!)
